
Expert articles on manufacturing, maintenance, and vehicle mirrors
View Products Contact Us
Discover technical details behind commercial and passenger side mirrors
Explore Range Request Quote
Insights into optical clarity, durability, and driver safety
View Inner Mirrors Get QuoteChoosing the right Canter Side Door Mirror affects more than appearance. It directly influences lane changes, reversing, loading, and driver confidence. A clear reflection can reveal a cyclist near the passenger side or a narrow post beside the rear wheel. A poor mirror may create blind spots, vibration, or distracting glare.
Commercial-vehicle mirror consultant Daniel Brooks explains, “The best mirror is the one that gives the driver useful information without demanding constant adjustment.” His point is practical. Mirror selection should match the truck’s year, cab design, mounting position, and daily working conditions. A delivery truck operating in crowded streets may need a wide-angle section. A construction vehicle may require a stronger housing and vibration-resistant glass.
Fit matters.
Before buying, compare the original mirror’s shape, bolt spacing, electrical connector, and adjustment method. Check whether the glass is flat, convex, heated, or electrically controlled. These details seem small. They can prevent an expensive return and hours of workshop delay.
The ideal Canter Side Door Mirror is not always the largest option. Oversized glass can distort distance. A cheap replacement may look correct but shake at highway speed. I have also seen buyers focus on price and overlook the mounting arm. That choice often creates trouble later.
This guide explains how to evaluate visibility, durability, compatibility, adjustment range, and installation quality. It also considers real driving conditions, because a mirror that works well in a quiet depot may perform differently on a wet, crowded road. Mistakes happen. Careful comparison reduces them.
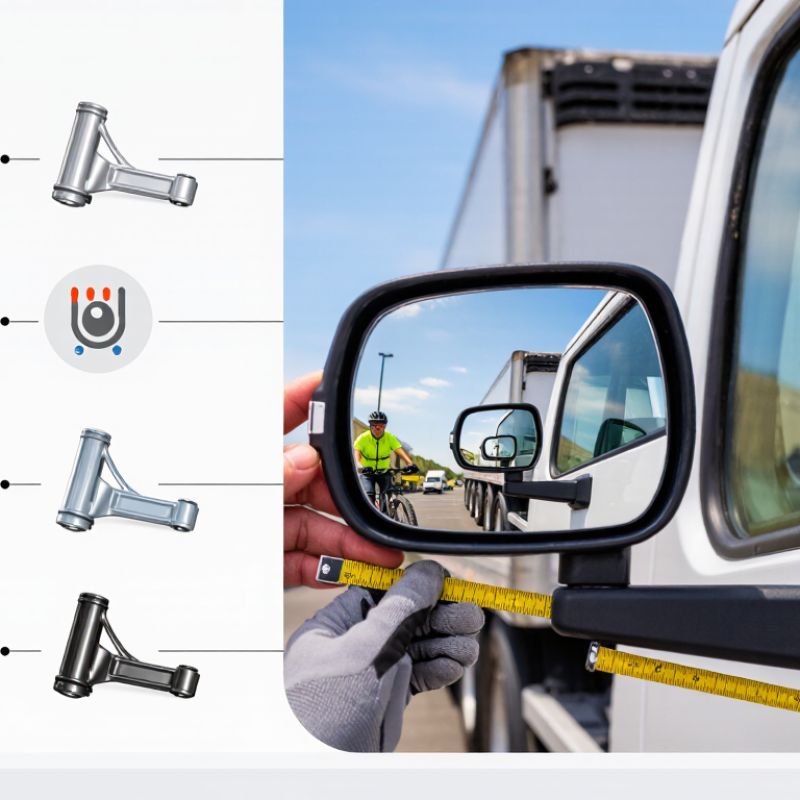
Canter side door mirrors usually come in flat, convex, heated, power-adjustable, and folding versions. Each type solves a different driving problem. A flat mirror gives a familiar, natural view with less visual distortion. It helps when judging the distance from a loading bay or narrow gate. However, its viewing area is limited.
A convex mirror shows more of the adjacent lane and blind spot. Objects may look smaller and farther away than they really are. That difference demands careful driver judgment.
Heated mirrors are useful in cold, wet, or misty conditions. They can clear light condensation and improve visibility during early deliveries. They do not replace cleaning or proper defogging.
Power-adjustable mirrors allow the driver to change the viewing angle from the cabin. This feature is practical when several people operate the vehicle. Manual adjustment is simpler and often easier to repair.
Folding mirrors reduce damage risks in tight streets and crowded yards. Electric folding mechanisms add convenience, but also add components that may fail.
I once focused too much on mirror size and ignored the mounting angle. That was a poor choice.
A larger mirror cannot correct an unsuitable position. Check the door mounting points, connector type, adjustment range, and housing strength before purchase. Make sure the mirror remains stable on rough roads.
For frequent urban work, a wide convex section and folding function may be worthwhile.
For highway use, stable adjustment and low distortion deserve greater attention.
The best specification depends on the driver’s route, weather, and daily loading conditions.
Choosing a Canter side door mirror starts with accurate vehicle identification, not appearance alone. Record the model series, production year, cab type, and steering position. These details affect mounting points, mirror arm length, glass shape, and electrical connections. Check the vehicle identification plate and service manual. Photos can mislead when a previous owner has changed the mirror. Nearly identical cabs may use different brackets. Measure twice.
Compatibility also depends on mirror function. Decide whether you need manual, heated, electrically adjusted, or signal-integrated operation. Count the connector pins and inspect the wiring before ordering. A replacement with the wrong plug may look correct but remain unusable. Compare bolt spacing, door clearance, folding direction, and blind-spot coverage. Left-hand and right-hand drive versions may not share the same assembly. Confirm the viewing angle from the driver’s seat.
Use a reliable parts catalogue or qualified vehicle technician to verify the reference number. Request written confirmation when model records are unclear. This matters for imported, repaired, or modified vehicles. Do not rely on a marketplace photograph alone. Small housing differences are easy to miss. Even careful checks can fail. After installation, tighten fasteners evenly and test adjustment, heating, and visibility. Recheck the mirror after a short drive, because vibration may reveal a poor fit.
| Canter Model Identification | Typical Vehicle Configuration | Common Mirror Arrangement | Door and Mounting Points to Check | Mirror Compatibility Requirements | Recommended Verification Method |
|---|---|---|---|---|---|
| FE Series | Light-duty cab-over truck, commonly configured with a narrow or standard-width cab and a two-door layout. | Large main side mirror on each door; some configurations also use a lower convex or wide-angle mirror. | Confirm the number of mounting studs, stud spacing, mounting plate shape, and whether the mirror arm is fixed to the door or the cab frame. | Replacement mirror must match the door-side mounting pattern, mirror-arm orientation, adjustment direction, and available clearance beside the cab. | Compare the original mirror with the replacement using a clear photo and accurate measurements before ordering. |
| FG Series | Medium-duty truck configuration, often with a heavier chassis and a larger cab-mounted mirror assembly. | Extended main mirror arms are common; additional convex viewing sections may be fitted depending on body design and local regulations. | Inspect arm length, bracket offset, mounting surface angle, and clearance from the door, front pillar, and body equipment. | The mirror should provide sufficient adjustment range without contacting the cab, body, or loading equipment when the door is opened. | Use the vehicle identification plate, cab photographs, and measurements of the complete bracket assembly for confirmation. |
| FE/FG Variant with Standard Cab | Conventional standard cab width with a relatively compact door and mirror mounting area. | Shorter mirror arm and compact housing are generally more suitable than wide-body mirror assemblies. | Measure the distance between mounting holes and check the hole diameter, gasket shape, and bracket contact area. | Choose a mirror that does not obstruct the side window, door handle, ventilation area, or driver’s direct view. | Take measurements with the original mirror removed and record the left- and right-side dimensions separately. |
| FE/FG Variant with Wide Cab | Wider cab or body arrangement requiring greater lateral viewing coverage. | Longer arms or wider mirror heads may be used to extend the viewing field beyond the body sides. | Check the distance from the mounting point to the outermost body edge and confirm that the arm will not interfere with nearby equipment. | Mirror width and arm reach must provide adequate rearward visibility while remaining within applicable vehicle-width limits. | Measure the required projection from the cab side to the mirror glass and compare it with the vehicle’s original configuration. |
| Left-Hand-Drive Configuration | Driver seated on the left side of the cab; commonly used in right-hand-traffic markets. | Driver-side and passenger-side mirrors may use different glass curvature, viewing angle, or arm geometry. | Identify the side from the driver’s seated position rather than assuming that left and right assemblies are interchangeable. | Confirm left/right orientation, convex or flat glass, adjustment direction, and whether the mounting bracket is side-specific. | Match the replacement to the steering-wheel position and the original side of installation. |
| Right-Hand-Drive Configuration | Driver seated on the right side of the cab; commonly used in left-hand-traffic markets. | Mirror position and glass curvature may differ from the corresponding left-hand-drive configuration. | Check the side-specific bracket, mirror-arm sweep, visibility through the side window, and door-opening clearance. | Do not assume that a left-hand-drive mirror assembly will fit or provide the correct viewing area on a right-hand-drive vehicle. | Confirm steering position, traffic side, mirror side, and the original part’s mounting orientation. |
| Manual Adjustment Mirror | Basic mirror assembly adjusted directly by hand from outside or through a manual control mechanism. | Usually has a simple housing, glass carrier, and mechanical pivot or adjustment cable. | Check the adjustment mechanism, cable or lever position, pivot location, and housing depth. | The replacement must use the same adjustment method and allow the glass to hold its position under normal vibration. | Move the original mirror through its full adjustment range and compare the replacement’s mechanism. |
| Heated or Electrically Adjustable Mirror | Higher-specification cab equipped with electrical mirror adjustment, heating, or both. | Mirror assembly may include a wiring connector, heating element, motor, or integrated turn-signal function. | Verify connector type, number of wires, terminal arrangement, cable exit location, and available power supply. | Electrical functions must match the vehicle wiring; a physically fitting mirror may still be incompatible electrically. | Compare the connector and wiring diagram, and test the vehicle-side power and control signals before installation. |
| Convex or Wide-Angle Auxiliary Mirror | Vehicle configuration requiring additional coverage near the front corner, lower side, or blind-spot area. | Small auxiliary convex mirror may be mounted above, below, or beside the main mirror. | Check auxiliary bracket location, viewing angle, clearance from the cab, and resistance to vibration. | The auxiliary mirror should complement the main mirror without creating excessive distortion or blocking the driver’s view. | Confirm the original position and viewing purpose before selecting a replacement auxiliary mirror. |
| Replacement by Glass Only | Original housing and bracket are undamaged, but the reflective glass is cracked, missing, or degraded. | Flat, convex, heated, or wide-angle replacement glass may be available depending on the assembly. | Measure glass length, height, corner radius, backing-plate shape, clips, adhesive points, and heating terminals. | Glass curvature, backing attachment, and heating connections must match the original mirror carrier. | Remove the glass carefully and compare the rear backing plate and attachment points before purchasing. |
Important: Model series and equipment specifications can vary by production year, market, cab width, steering position, and body application. Always verify the vehicle identification plate, mirror side, mounting measurements, electrical connector, and original mirror configuration before installation.
How to Choose the Right Canter Side Door Mirror?
Compare Mirror Visibility, Adjustment, and Blind Spot Coverage
Choosing a side door mirror for a Canter starts with usable visibility, not appearance. From the driver’s seat, check whether the mirror shows the rear door edge and nearby traffic without excessive distortion. A broad viewing area helps during lane changes, reversing, and loading beside a narrow curb. Small differences matter.
Adjustment range is equally important. Sit in your usual driving position, then move the mirror through its full vertical and horizontal range. You should find a clear setting without stretching or leaning forward. If another person drives the vehicle, the mirror should reset easily. Check it twice. A stiff joint may feel secure at first, but it can become inconvenient during daily use.
Blind spot coverage needs a practical test. Place a person or a clearly visible object beside the rear quarter, outside the direct window view. Adjust the mirror until the object enters the mirror as it leaves your peripheral vision. Convex glass can widen coverage, though it may make vehicles look smaller and farther away. That takes practice. I have sometimes preferred a slightly narrower view because distance felt easier to judge, but that choice is not perfect for every driver. Look for a stable reflection, smooth adjustment, and minimal vibration on uneven roads. A mirror that covers more area is useful only when its image remains clear enough to support confident decisions.
Compare mirror visibility, adjustment range, and blind-spot coverage before selecting a side door mirror. The values below are normalized reference scores based on typical flat, convex, and wide-angle mirror characteristics.
Wide-angle mirrors generally provide the broadest viewing area and blind-spot coverage, while convex mirrors offer a balanced compromise. Flat mirrors usually provide the most natural distance perception but cover a smaller area.
Choosing the right Canter side door mirror starts with its mounting style. Confirm the door profile, bolt spacing, arm length, and adjustment range. A rigid bracket reduces vibration on rough roads. A flexible arm may absorb minor impacts, but it can move out of position. Measure carefully. Small fitting errors create large blind spots.
Features should match daily driving conditions. Choose a wide-angle section for lane changes and a clear flat section for distance judgment. Heated glass helps in rain, frost, and early-morning condensation. Electric adjustment saves time, especially for vehicles with several drivers.
That figure does not prove mirror failure caused crashes. It does show why reliable indirect vision deserves serious attention. Check vibration, image distortion, and water entry during a real road test.
Tips: Verify local inspection rules before buying. UNECE Regulation No. 46 covers indirect-vision devices, while FMVSS 111 applies in the United States. Requirements differ by market. Look for compliant markings and fitting instructions. Select corrosion-resistant hardware for winter roads.
Inspect the mirror after washing, loading, or a light knock. I once trusted a mirror that looked perfect while parked. At speed, it shook badly. Durability is not just material strength; it is stable visibility over time. No mirror is perfect. Proper adjustment still matters.
How to Choose the Right Canter Side Door Mirror?
Select the Right Supplier and Verify Installation Requirements
When choosing a Canter side door mirror, supplier quality matters as much as appearance. Look for precise vehicle-fit data, clear measurements, and traceable quality checks. A reliable seller should confirm the cab type, production year, door position, and adjustment method. Ask for installation drawings, not vague promises. Small details prevent expensive returns.
Before ordering, compare the mirror’s mounting pattern with the existing door bracket. Measure bolt spacing, arm length, glass size, and connector shape. Check whether the assembly includes wiring, a heating element, or a separate mounting plate. These parts may look minor, but they can stop installation completely. I once trusted a matching photograph and missed a connector difference. The mirror arrived clean and undamaged, yet it was unusable without an adapter. That mistake changed my checking process.
Request written compatibility details and ask how the supplier handles damaged parts or missing hardware. Installation instructions should identify tools, torque guidance, cable routing, and adjustment procedures. A qualified technician should test visibility, folding movement, and vibration after fitting. Do not rely only on a quick visual check. A mirror can sit firmly and still show a distorted field of view. Keep the original fasteners until the replacement works properly. If any measurement remains uncertain, pause the order and confirm it.
Common options include flat, convex, heated, power-adjustable, and folding mirrors. Each type addresses a different driving condition.
A flat mirror provides a familiar image with limited distortion. It helps judge distance near loading bays, walls, and narrow gates.
A convex mirror shows more of the adjacent lane and blind spot. Nearby vehicles may look smaller and farther away, so careful judgment is necessary.
Heated mirrors can clear light mist and condensation during cold, damp mornings. They do not replace cleaning or proper window defogging.
Power adjustment is convenient when several drivers use the vehicle. Manual mirrors are simpler and may be easier to repair.
Folding mirrors can reduce contact damage on narrow streets and crowded yards. Electric folding adds convenience but introduces more parts that could fail.
Place a visible object beside the rear quarter, outside the direct window view. Adjust the mirror until the object enters view as it leaves your peripheral vision.
Check the mounting points, connector type, adjustment range, and housing strength. Confirm that the mirror stays stable on rough roads.
Not necessarily. A large mirror cannot fix a poor mounting angle or excessive vibration.I learned that the hard way.
A wide convex section and folding function may help in tight streets and busy loading areas. For highway driving, stable adjustment and low distortion may matter more.
Choosing the right Canter Side Door Mirror begins with understanding the available mirror types and how they differ in shape, mounting position, adjustment range, and visibility. First, identify your vehicle’s exact model, year, cab configuration, and existing mounting points to ensure compatibility. Consider whether you need a standard, wide-angle, heated, manually adjustable, or electrically adjustable mirror. A suitable mirror should provide a clear view along the vehicle’s side, improve blind spot coverage, and remain easy to adjust for different drivers and driving conditions.
Before purchasing, check the mounting style, mirror dimensions, connection method, and any additional features required for your vehicle. Durability is also important, so look for strong materials, stable joints, weather resistance, and reliable glass quality. Confirm that the mirror meets applicable vehicle equipment and visibility standards in your area. Finally, choose a dependable supplier, verify the supplied components, review installation requirements, and make sure the mirror is securely fitted and correctly aligned before use.